Friday, March 30, 2012

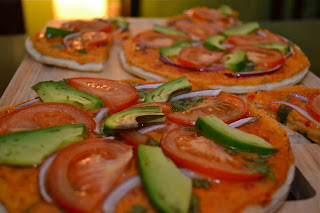
Island Hummus Pizza

This is a fun and favorite pizza that me and my husband love to make. It was actually inspired by a trip to Guam. He was deployed (more like took a vacation) to Guam a couple of years ago while I was back at our home station in Alaska.
 We didn't want to miss our first anniversary due to his deployment so I decided to fly to Guam for a couple of weeks to celebrate  and take a little vacation myself. After I left, he had to stay to finish out his deployment..cough umm "vacation" he went to an outdoor pizza grill with some friends and had mentioned to the chef that he was vegetarian, the cook made him something special with hummus and sweet red chili sauce. Once my husband returned from Guam he wanted to recreate it. So this is the Guam inspired island hummus pizza.

Island Hummus Pizza
Oishii Treat Original 

Bake Time: 15-18 Minutes
Ingredients
1 package of pre made thin crust pizza (I bought the 3 small thin crust pack, but you can buy the large size)
3 Tablespoons Roasted Red Pepper Hummus for each small pizza. (9 Tbs total)
1 Tablespoon of Sweet Chili sauce for each small pizza (3 Tbs total) you can usually find it in the Asian food section of your local grocery store. 
1/4 Red Onion sliced
1/2 Avocado Sliced
1/4 Cup chopped Cilantro
1/2 Tomato sliced
2 Limes

Directions 
Preheat Oven to 350 degrees. 
To assemble the pizza(s) First take 3 Tbs Hummus and using the back of a spoon ,spread evenly over crust.  Add 1 Tbs of Red chili sauce and carefully spread on top of hummus with the back of the spoon. Sprinkle with cilantro and squeeze a little lime on top and add your onions, tomatoes, and avocados. 

                                        
 Place on the middle rack of your oven and bake for 15-18 minutes.


Wednesday, March 28, 2012

Crock Pot Vegetarian Taco Soup

There is nothing better than coming home from a 12-13 hour shift to a house smelling like chili and knowing that all you have to do is remove your uniform, throw on some sweats and your dinner is already cooked and ready to be dished up. Am I right?  I love my crock pot especially when we have week long exercises. Because seriously after working 12 hours, wearing chem. gear and a 20lbs flak vest all day, I barely have the energy or desire to cook anything. Most of the time I would throw a frozen pizza in the oven, but frozen pizza for a week every night is not always the healthy choice.

Luckily I'm not working a 12 hour shift this week, but that doesn't mean I still don't like to come home to my house smelling like chili and knowing I don't have to cook for a night :)


< Another reason behind the Soup, Seriously its March!


Crock Pot Vegetarian Taco Soup
Slightly Adapted from Foodie with Family
Yields: 6-8 servings 
Cook Time: 6-10 Hours (Depends on when I get off work)

Ingredients

1 Package frozen Morningstar beef crumbles
1 large onion (Diced to medium sized pieces) 
1 (28oz) can of diced tomatoes
1 can of Black Beans (drained and rinsed)
1 can of Pinto Beans (drained and rinsed)
1 can of chili beans in mild sauce
2 Cups frozen corn
3 Poblano green peppers (deseed and slice)
2 teaspoons minced garlic
1 teaspoon chili powder
1 packet of taco seasoning
1/2 packet ranch dressing mix
2 Cups vegetable broth

Directions

Toss everything into a crock pot, stir together and set on low for 6-8 hours. 


 Optional Garnish 

  • Blue tortilla chips
  • Shredded Cheddar Cheese
  • Sour Cream
  • Chopped Cilantro


Monday, March 26, 2012

Chocolate Cupcakes w/ Cream Cheese frosting and a hidden surprise.

This is my last Birthday for the month! phew, the best thing about birthday's is that it's a great excuse to get in the kitchen and bake something, though in the last couple of weeks I think my sweet tooth has finally been satiated, I didn't think that was possible. Plus I ended up not making myself a cake yesterday just because we still had cake left over from my husbands and Tess's b-day.
I made these cupcakes for a co-worker and friend at work who's special numbered birthday is tomorrow, which I won't dime out her age (pssst its the big 30!) So I will just go and say Happy Birthday to Melissa.

She didn't want anything fancy flavor wise and had requested something made with chocolate but not all chocolate and there were certain flavors she wasn't a big fan of, so the vanilla frosting was added.  But there is some hidden surprises inside some of the cupcakes.  About a dozen cupcakes have a chocolate ganache filling, and others have a homemade cherry filling left over from the black forest cake.


Chocolate Cupcakes w/ Cream Cheese Frostings and hidden surprises.
Adapted from Better homes and Garden Special Interest Publication "Cupcakes"
Yields 24 Cupcakes and 24 mini Cupcakes

Ingredients
3/4 Cup Butter
3 Eggs
2 Cups All purpose  Flour
3/4 Cup unsweetened cocoa powder
1 teaspoon baking soda
3/4 teaspoon baking powder
1/2 teaspoon salt
2 Cups Sugar
2 teaspoons Vanilla
1 1/2 Cups Almond Milk

Directions
preheat oven to 350 degrees
Let the butter and eggs stand at room temp for at least 30-45 minutes. In the meantime line 24 muffin tins with cupcakes liners, and a 24 mini muffin tin with 24 mini cupcake liners.
In a medium bowl combine together the flour, cocoa powder, baking soda, baking powder, and salt set aside.
In a large mixing bowl beat butter with a electric mixer on high for 30 seconds, add your sugar a little at a time until mixed into the butter. scrape the sides of the bowl and beat for another 2 minutes until light and fluffy. Add eggs one at a time until fully mixed into the batter.  Add your vanilla and alternately add your flour mixture and milk to the batter, beating on low to medium speed until fully combined.
Spoon batter into your muffin liners, filling about half way to 2/3 full.
Bake for 18-22 minutes or until a wooden toothpick inserted in the middle comes out clean. Cool cupcakes on a wire rack, while cooling make your ganche and cream cheese frosting.


Ganache

Ingredients 
1 Cup whipping cream
12 ounces semisweet chocolate

Directions
In a medium saucepan bring whipping cream to a boil over medium high heat, once it has started to boil remove from heat and add your chocolate, do not stir. Let the chocolate sit in the cream for 5 minutes. After 5 minutes stir until smooth. cool for another 15-20 minutes. before adding it into a pipping bag.

Cream Cheese Frosting


Ingredients
1 8 ounce package of cream cheese
1/2 cup butter
2 teaspoons vanilla
5 1/2 Cups powdered sugar


Directions
Let the cream cheese and butter sit at room temp for at least 45 minutes. In a large mixing bowl beat the butter, cream cheese, and vanilla with an electric mixer on medium to high speed until fluffy. Gradually add your powdered sugar until full combined. place in the fridge until ready to pipe or frost cupcakes.

*To fill your cupcakes with the ganche use a pipping tip by itself to create a small hole/crater inside the cupcake once you have a hole pipe some ganche inside or add whatever surprise you want :)


Sunday, March 25, 2012

Versatile Blogger Awards


I was just recently was nominated by one of my new Foodie friends from Smitten Kitchen for the Versatile Blogger Award . I am very honored and excited that someone would take the time to send me a shot out.  This is my first nomination and I can't be more surprised and honored :)


Here are the rules for the Versatile Blog Award:
  •  Thank the person who gave you this award. 
  •  Include a link to their blog.
  •  Next, select 15 blogs/bloggers that you’ve recently discovered or follow regularly. 
  •  Nominate those 15 bloggers for the Versatile Blogger Award.
  •  Finally, tell the person who nominated you 7 things about yourself. 
There are also a few add-on rules:
  • In the same post, include this set of rules. 
  • Inform each nominated blogger of their nomination by posting a comment on each of their blogs
So, what is the Versatile Blogger Award?  ”It is a great way to introduce different bloggers to each other and to promote quality blogs that awardees and their readers may not have discovered otherwise.”
Here are my 15 nominees, please check them out for some amazing recipes and photos!

The 7 Random Things about me?

1. I am a natural Red head and I have never dyed my hair, I was threatened as a child by my Nana to never do it and I have been scared ever since. 
2. I learned to play ping pong while deployed to Iraq and UAE and found out I was pretty good at it.
3. I prefer hot climates to cold climates. I rather be in 115 degree weather than anything under 32 degrees
4. I know how to order something with no meat at a restaurant in Japanese.  Oniku Nashi de Onegaishimasu, wa tashiwa betetarian. I get patted on the head a lot by locals for saying it in japanese :) They are really impressed when an American actually tries to speak their language. 
5. I'm a bad flyer, I don't like flying at all. Although I'm in the Air Force, Ironic right?
6. I'm a huge Billy Joel fan, I started listening to him when I was 12. when other girls were listening to backstreet boys, I was listening to Billy Joel. 
7. If I wasn't in the Air Force, I would probably be a competitive runner. 

Saturday, March 24, 2012

Guest Post *Slow Cooking Kitchen: Royal Malibu Coconut Cake w/ Raspberry Jam


 A delicious coconut cake layered with raspberry jam, Malibu Rum icing, and chocolate ganache drizzle. 


Have you met Neshanne of Oishii Treats? If not, you should take a moment to visit her blog and wish her a Happy Birthday. Not only does she serve up "MUST HAVE" delicious treats, she also actively serves in the U.S. Military in Misawa, Japan
. Now that's impressive!

Happy Birthday, Neshanne!!! May your day be filled with happiness, harmony and oishii calories, lol !!!


*Wow! Tess out did herself with this beautiful cake and I cannot thank her enough, not only for the cake but her kind words as well. For the recipe to the this rockin Malibu Coconut Cake go to Slow Cooking Kitchen, and please visit for her blog for her awesome recipes and beautiful pictures. 

Friday, March 23, 2012

Black Forest Cake

I have noticed that March is a very busy month for birthdays, not only was my husbands birthday last week and mine this week. But I learned that my friend Tess from Slow Cooking Kitchen's birthday too! and I wanted to bake a cake especially for her, call it a virtual birthday cake/party.
This Black Forest Cake is made with chocolate, brandy, and cherries. All chosen just for Tess :)
In between two chocolate cakes is a middle made of  cherry filling sprinkled with coconut. The cake is covered with a Cocoa butter frosting, homemade whipped cream, cherries and shaved chocolate sprinkles.
Happy Birthday Tess!!! I hope you enjoy your cake ;)


Black Forest Cake 
Adapted from Better homes and Garden Special Interest Publication "Cupcakes "
Ingredients
2/3 Cup Butter
2 Eggs
2 1/4 Cups all purpose flour
1 teaspoon baking powder
3/4 teaspoon baking soda
1/4 teaspoon salt
1 3/4 Cups sugar
3 ounces unsweetened chocolate, melted and cooled
1 teaspoon vanilla 
1 Cup water
1/4 Cup Brandy

Recipes for Coca butter frosting, Cherry filling and whipped cream below.

Directions
Let your butter and eggs stand for 30 minutes at room temperature. In the meantime grab two 9inch round cake pans and grease with a vegetable spray and sprinkle with a tiny amount of flour. set aside
In a medium bowl combine your flour, baking powder, baking soda and salt. set to the side.

Preheat oven to 350 degrees. In a large mixing bowl beat butter with a electric mixer on medium high for 30 seconds.  Gradually add sugar about 1/4 cup at a time, mix on medium speed until light and fluffy. Add eggs one at a time and mixing until combined.  Add in melted chocolate and vanilla. Mix until combined.  Alternately add your flour mixture and water to the butter mix, mix on low until all combined.  Stir in Brandy. 

Pour your batter in even amounts into each round cake pan. and place both pans on the middle rack.  Bake for 28-30 minutes or until a toothpick inserted in the center comes out clean. Let cakes cool out of the pan on a wire rack.  Start your filling and frosting. 

Cherry Filling
3/4 Sugar
3 Tablespoons cornstarch
1/3 cup water
3 cups thawed cherries (I had to use frozen since cherries are not in season)

Directions
Combine your sugar, cornstarch, and water in a medium saucepan on medium heat, stir until combined.  Add your cherries and cook and stir on medium until thickened and bubbly.  remove from heat and let cool. 

Cocoa Butter Frosting
1/3 cup butter (at room temp for at least 30 min.)
4 1/4 cups powdered sugar
2 tablespoons unsweetened cocoa powder
1 ounce unsweetened chocolate (melted)
3 Tablespoons almond milk (or milk)
1 teaspoon vanilla

Directions
Beat the butter in a electric mixer until smooth, gradually add 1 cup powdered sugar, 2 Tablespoons cocoa powder and 1 ounce melted unsweetened chocolate. Mix until all is combined. Mix in 2 Tablespoons almond milk and vanilla, slowly mix in 3 1/4 powdered sugar and the additional 1 tablespoon almond milk.  mix well until you have a frosting that consistency is good for pipping. 

Whipped Cream
1 1/2 Cups Whipping cream
2 Tablespoons Sugar
1 1/2 teaspoons vanilla.

Directions
In a chilled mixing bowl combine your whipping cream, sugar and vanilla. beat on medium speed until soft peaks form (takes about 5 minutes)

To assemble the Cake

1. Place one of the cakes on any desired plate
2. Spread your cooled cherry filling on top (be careful you will have some filling left over, if you add all of it, it will spill out once you place the second cake on top.)
3. Sprinkle some sweet shredded coconut on top of the cherry filling
4. Place your second cake on top.
5. Forst your cake with the cocoa butter frosting
6. Add some left over cocoa frosting into a pipping bag and decorate your cake
7. Add some whipped cream into a pipping bag and decorate.
8. Shave some sweetened chocolate with a cheese grater and decorate your cake. 
9. Top the cake with some maraschino cherries. 

Have fun with decorating, I'm pretty new at the whole decorating part. This cake is probably the best attempt I personally have done so far. Practice makes perfect right, now if I can just learned to restrain myself enough to stop licking the spoon when making the frosting and whipped cream ;)


Thursday, March 22, 2012

Split Pea Soup w/ Garlic Basil Soda Bread

I know most of you are probably feeling the effects of spring with the warmer temperatures, doning light weight jackets and listening to the birds chirp.  Well unfortunately northern Japan is just not quite ready for spring :( Actually the day of spring equinox we were having snow flurries and accumulated about 2 inches of snow. esssshh I thought Alaska was bad about long winters, never thought I would have to deal with another prolong winter living in Japan. You know whats crazy if you drive 4 hours south the weather changes drastically.

 While I'm looking forward to warmer temps and blossoming foliage I will settle for a  warming comforting soup thats great for our still chilly "spring" days.  I also need a delicious bread to dip into this split pea soup, and since Soda bread is quick and easy to whip up while the soup is cooking its a great partner for this recipe.


Split Pea Soup
Adapted from Food Fit.com
Yields 6
Ingredients
1 tablespoon olive oil
1/2 cup chopped carrots
1/2 cup finely chopped celery
1/2 cup finely chopped onions
1 sprig fresh or 1/4 teaspoon dried thyme
freshly ground black pepper
1 1/2 quarts vegetable stock
2 cups dried split peas
1 Teaspoon Garlic salt to taste (add at the end of cooking, if you add in the beginning the salt will prevent the peas from becoming tender)
freshly ground black pepper

Directions
This is my secret weapon when it comes to chopping a lot of veggies into small pieces The Chop Wizard! (its amazing when you have to cut a ton of onions)
Heat the oil in a saucepan over low heat. add the carrot, celery, onion and thyme, season lightly with pepper and cook for 10 minutes or until vegetables are tender. 

Add the stock and split peas, and bring to a boil quickly over high heat.
Lower the heat and simmer until the peas are tender, about  70 minutes.
Puree 2/3 of the soup in a blender and stir it into the remaining 1/3 or if you prefer more of a smoother soup you can puree the whole batch.

 Add salt and additional pepper to taste.

Garlic Basil Soda Bread
Adapted from Bon Appetit 

Ingredients
3 1/2 Cups all purpose flour
1 teaspoon baking soda
3/4 teaspoon garlic salt
3/4 teaspoon dried basil 
1 1/2 cups buttermilk
Topping for the bread
about 1 Tablespoon minced garlic
dried basil and garlic salt to sprinkle on top

Directions
Preheat oven to 425°F. Lightly flour baking sheet. Mix flour, baking soda and garlic salt in a large bowl. Mix in buttermilk to form moist clumps if you still have a lot of flour left over add a little bit more buttermilk. Gather dough into a ball. Turn out onto lightly flour surfaced and knead just until dough holds together, about 1 minute. Shape dough into 6-inch-diameter by 2-inch-high round. Place on prepared baking sheet. Cut 1-inch-deep X across top of bread, extending almost to edges. spread minced garlic on top of the loaf and sprinkle with some dried basil and garlic salt. Bake until bread is golden brown and sounds hollow when tapped on bottom, about 35 minutes. Transfer bread to rack and cool completely.


Note: It took my bread about 10 extra minutes to bake and even then it was still a little too soft, I believe my bread was just to tall, I probably did't keep it under the 2 inch high mark. Next time I think I will shape it more like a loaf spread out a bit to help it back better. 


Tuesday, March 20, 2012

Spicy Black Bean Hummus

Dips, sauces, and all condiments are my friend (a tiny hug to all of you sitting in my fridge right now).  I love condiments, I always like when I can dip something, anything into a sauce. I just like how it can change the flavor of dull veggie sticks, plain fries, rice, bread, the list can go on and on. That's why I tend to make hummus a lot and all sorts of different kinds.

Back during Thanksgiving I had found a recipe for a black bean hummus with cilantro and lime that I couldn't pass up. To accompany the hummus I had baked some fresh semolina bread and the two combined together was magic :) warm baked bread with spicy black bean hummus spread on top was divine. I think I was full on bread and hummus before we even got to the main course.

I will say though the first time I made this recipe I used 1 chipotle pepper in adobo sauce and it was awesome.  Today I used jalapenos which were good, but I think I prefer the chipotle pepper in the adobo sauce mixed into the hummus.  Maybe you have a favorite pepper that you would like to add.


Spicy Black Bean Hummus
Adapted from David Bonom, Cooking Light


Ingredients
1/2 Cup chopped fresh cilantro
2 Tablespoons tahini (roasted sesame seed paste)
2 Tablespoons water
2 Tablespoons fresh lime juice
1 Tablespoon extra virgin olive oil
3/4 teaspoon ground cumin
1/4 teaspoon sea salt
1 (15 ounce) can of black beans, rinsed and drained
1/2 teaspoon minced garlic
about 1/4 cup sliced jalapenos (add a little at time to your liking, incase you prefer more mild or spicy)
This is what I used for the Hummus. you could always sub the water for some of the jalapeno juice for some more kick. 


Directions


Add all the ingredients expect the jalapenos into a food processor, mix until smooth.  Add your jalapenos in a little at a time and grind/chop the mixture. keep doing that until the heat is the way you like.

Monday, March 19, 2012

Veggie Teriyaki Burger

Sometimes living overseas I do tend to miss the occasional chain restaurant (gasp! I know I admitted that I like chain restaurants, but I'm not gonna lie they are nice to go to when you just dont have the energy to cook after a 14 hour shift).
I favor Olive garden, Wendy's (for the frosty's) and Red Robin.  Me and my husband loved the teriyaki and western bbq burgers at RR's. What was best about them was that we could sub the meat burger for a veggie one.  Well we have been craving burgers for awhile and my husband suggested I try to replicate the one from Red Robbin.  This is my twist on RR's Teriyaki burger and you can't see it but I'm slapping myself on the back for a job well done.  Or perhaps I think I did such a good job because its been about a year since I've been to an American restaurant and I forgot how they taste ; )  oh well.


Veggie Teriyaki Burger
An Oishii Treat Original

Yields 2

Ingredients
2 Whole Wheat Buns
2 Boca Burgers
1 can of pineapple rings
1 1/2 Cups Cabbage
1 Tablespoon Sesame Seed Oil
2 Slices Tillamook Cheddar Cheese
and your favorite teriyaki sauce (I used Marukin Teriyaki Sauce)

Directions

Bake your Boca burger according to packaged directions, 2 minutes before they're done add a slice of cheddar to the burger to melt.
Heat a sauté pan on medium high heat, add 1Tablespoon sesame seed oil. Slice your cabbage thinly and add to the pan, sauté for about 4-5 minutes until soft.  Remove the cabbage and add two pineapple rings to the pan and sauté for another 2-3 minutes.
To assemble the burger
Slice your buns in half and add some teriyaki sauce to both sides. place your burger with the melted cheddar on first, then top with a pineapple ring, add your sauteed cabbage, sprinkle with some more teriyaki sauce and top it off with the other bun and enjoy.

Sunday, March 18, 2012

Pineapple Upside-Down Muffins

Well I woke up today with a minor hang over, I'm not much of a drinker so anything more than one drink I usually end up with a headache.  Weak sauce right?  Anyways I prefer to be the DD in most situations.  But I couldn't let St Patties day and my husbands birthday pass without going to the only Irish bar in Misawa Japan and having a pint of Guinness. I love this bar (wishing I had a picture of it) it's called Paddy's and its literally like stepping into a irish drinking pub, they have celtic music playing in the background, authentic poured Guinness on tap and all sorts of neat knickknack and pictures on the walls. The Japanese man that owns the bar actually went to Ireland for sometime to learn how to pour a Guinness and run a pub. Pretty cool and he has pictures around the bar of his year spent in Ireland. Anyways I've been craving muffins for sometime and waking up this morning with a headache I thought muffins might be a good remedy and a healthy snack to take to work during the week. These muffins aren't only Oishii but they are healthy.  Made with part whole wheat flour, a little sugar and lots of pineapples and carrots I don't feel so guilty sinking my teeth into one of these plump muffins. By the way funny story I almost added Roasted Cumin to the batter instead of Cinnamon, I bought both spices recently and grabbed what appeared to be cinnamon and I started to measure out the spice and was just about to toss it into the batter when I got a whiff of "cinnamon" only to take a second glance at the jar I was holding and notice that it was Roasted Cumin oops..that could I have had some interesting consequences. Thank goodness for my sense of smell.

Pineapple Upside-Down Muffins
Adapted from Eating well

Yields 12 Muffins

Bake time 20-25 Minutes


Ingredients 

Topping

  • 2 tablespoons packed light brown sugar
  • 2 tablespoons chopped Almonds (or your choice of nut)
  • 1 10-ounce can pineapple slices

MUFFINS

  • 3/4 cup whole-wheat flour
  • 3/4 cup all-purpose flour
  • 2 teaspoons baking powder
  • 1/2 teaspoon baking soda
  • 1/4 teaspoon salt
  • 1 tablespoon ground cinnamon
  • 2 large eggs
  • 1/2 cup packed light brown sugar
  • 1/4 cup canola oil
  • 2 tablespoons pineapple juice, or orange juice
  • 1 teaspoon vanilla extract
  • 1 8-ounce can crushed pineapple, (not drained)
  • 1 cup grated carrot
  • 1/2 cup old-fashioned oats
  • 1/4 cup chopped Almonds 
Note: The original recipe calles for rasins, I didn't have any but I'm sure if you add them it will bring some more natural sweetness to the muffins.

Directions
  1. Preheat oven to 400°F. Coat 12 muffin cups with cooking spray.
  2. To prepare topping: Sprinkle 1/2 teaspoon brown sugar into each muffin cup. Sprinkle nuts, if using, over the sugar. Stack pineapple slices and cut into 6 wedges. Place 2 wedges in each muffin cup.
3.Whisk eggs and brown sugar in a medium bowl until smooth. Whisk in oil, juice and vanilla. Stir in crushed pineapple. Make a well in the dry ingredients; add the wet ingredients and stir with a rubber spatula until just combined. Stir in carrot, oats, and nuts, if using. Scoop the batter into the prepared muffin cups (they'll be quite full).

4.  Bake the muffins until the tops are golden brown and firm to the touch, 20 to 25 minutes. Immediately loosen edges and turn muffins out onto a baking sheet. Restore any stray pineapple pieces and nuts. Let cool for at least 10 minutes. Serve upside-down, either warm or at room temperature.


Saturday, March 17, 2012

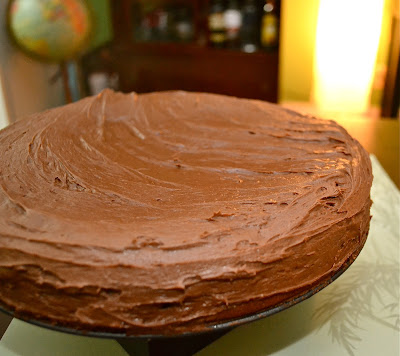
Jakes Whiskey Cake

Happy 25th Birthday to my wonderful hubby.  Can I just say that my husband has the best day for a birthday, whats cooler than having your birthday on St. Patrick's day.  For about a week I kept asking him what kinda of cake he wanted me to make, and he would keep flip flopping from two types.  Mint chocolate chip cake or a whiskey cake.  Now my mom recently made my nana a whiskey cake for her 70th last month and she basically ate the whole thing by herself and even got a little buzz from it.  After telling my husband the story he finally made up his mind on the Whiskey cake.  Though I didn't think it would be so hard at first to choose. He is a whiskey and scotch guy so I initially thought it was a no brainer.
So a little about this cake recipe, after my mom emailed me her ingredients.  I started to second guess her cake.  The last ingredient for the cake is mini marshmallows..... Huh... ummm am I missing something? marshmallows in a whiskey cake, is that normal? Tell you the truth I kept thinking she was playin with me, or she just read the wrong recipe.  But the time difference in Japan and Oregon is 16 hours.  So I couldn't call her before making it, and I googled searched recipes for whiskey cake (yes there I go again google searching, its like spell check to me) and not one recipe mentioned marshmallows, not one! well I had faith in my mama and I just went with it and it turned out that you can't really tell if the marshmallows ever existed in the cake, you can't really taste them, what you can taste is the whiskey, this cake is super moist and dense and extremely strong. Now I see why my nana likes it so much :)

Disclaimer* dont eat and drive after having a slice of this cake its definitely like taking a shot of whiskey ;) grown ups only. 


Chocolate Whiskey Cake
 Recipe from my mom


Bake Time 35-45 Min. (Depending on your oven)
Ingredients 
1 cup soft margarine or butter
1 3/4 cup sugar
1 teaspoon baking soda
2 cups flour
3 Tablespoons cocoa
1 teaspoon. vanilla
1/2 cup buttermilk
2 eggs
1 cup whiskey 
1 1/2 cup mini marshmallows

Directions

Combine first 8 ingredients and blend for 1 minute. Add whiskey and marshmallows. Mix together. Pour into 9x13 pan, and bake at 350 for 35-45 minutes. Around the 35 min. mark Insert a long toothpick or knife to see if it comes out clean if so your done, if not bake for another 5 min. and check again.  While slightly warm, frost with whiskey frosting.

(I did not happen to have a 9x13 pan so I used a spring foam pan and it worked out really well, plus I didn't have to worry about transferring the cake onto a plate.)


Whiskey Frosting
1/2 cup soft butter or margarine
4 cup powdered sugar
3 Tablespoons cocoa
1/3 cup whiskey
1 cup chopped pecans (I originally omitted the pecans, just because I didn't have any at the time)

Mix until smooth. Spread over warm cake.


you see that whole in the cake, its where a marshmallow used to be. Thats the only way I could tell there was marshmallows in the cake.

Related Posts Plugin for WordPress, Blogger...