Showing posts with label vegetarian. Show all posts

Monday, May 27, 2013

A juicing experience: Ruby Red Juice


Military Life:  Did you know all military members have to pass a annual/semi annual physical fitness test every year (PT test as we like to call it).  If you dont you could potentially be kicked out of the military for not staying physically fit. The military puts a lot of emphases on being "fit to fight" you wont do yourself or any of your battle buddies any good if you are huffing and puffing in your 50 lbs Kevlar gear in the desert under hostile conditions, trust me that gear is heavy I know.  Now we're all not constantly deployed or in hostile conditions, but you still need to stay fit incase you have to be deployed, not to mention its just healthier and better for you if you are constantly striving to be or stay fit.  Plus talk about a good motivator to get your butt in the gym, (at least for me it is) its either workout and stay in shape or basically get fired!  In the last few years as I start to creep up into my late 20's, dare I say close to 30 :/  I have found it harder and harder to keep those pesky pounds off, I was not fortunate enough to be blessed with the skinny gene, I have always had to make sure that I not only eat healthy but I have to add daily exercise into my routine or poof I swear in 3 months I can put on 10 lbs.  


Because of my constant need and my own personal desire to stay healthy and fit, I have been trying to incorporate more vitamins into my diet.  My kryptonite is a multivitamin, this girl cannot talk adult sized multivitamin without getting sick, seriously it will come right back up (sorry not trying to gross you out), I've tried taking Flintstone vitamins but I'm the worst at remembering to take it and even when I do they still make me somewhat nauseas. Recently I came across an article about juicing and how juicing your veggies and fruits deliver their vitamins and nutrients straight into your blood stream because your stomach doesn't need to break down or digest any of the fibers from the produce.  Well, I received a juicer a couple of months ago for a birthday present from my hubby, and he was smart and didn't buy a super expensive one, he got me something mid price and would get the job done and I could not be happier with my juicer.


 I love taking random fruits and veggies from the fridge and juicing them to see what delicious concoctions I can create, not only do I enjoy taking my vitamins in juice form but its quite filling and I sometimes will drink a big glass of juice as a meal replacement.  You'll also find out quickly which combinations dont work while juicing,  like celery ...Yuck, seriously I'm not kidding freakin gross! I dont know what it is but I thought I would like cerely, I cook with it, I like to eat it raw but I found that I do not like it juiced at all, it literally runis any juice if I add a stalk of celery in it, its just so over powering and bitter? not sure how else to explain it, but celery will probably never end up in a juice of mine ever again, especially not after having to choke down a juice I made recently with celery in it, because I refused to toss it down the drain, especially when most fruits and veggies are pretty pricy here in Japan. Other than hating on celery I really enjoy beets, they have a distinct taste but not in a bad way, and juicing beets produces the most gorgeous ruby color. This particular juice is very beety, if its too overwhelming try adding grapefruit. 


This picture does not represent the amount
I put into the juice, just the produce I used,
 I used almost half of what you
see here for my juice (not shown is lemon)


Ruby Red
Recipe by Oishii Treats

Yields:  8 oz

Ingredients

1/2 (2" in diameter) Beet, peeled and sliced small enough to fit in your juicer
1/2  (5 inch long) Sweet Potato, sliced
1 small carrot or 5-6 baby carrots
1 small apple, sliced and remove seeds
1 inch sized piece of ginger
2 think slices of a lemon, cut off the peel

Directions

-Add all ingredients into your juicer, once juiced, stir all together and enjoy.


This is a rough estimate of the nutrition and vitamins of this particular juice from using Juice Recipes Juice Builder
Calories: 108  Potassium: 497 mg  Vitamin A: 52.5%  Vitamin C: 15.96%  Calcium: 3.55% Iron: 10.56%

Note: If the juice is too beety try adding some grapefruit for a more sweet and sour flavor.


Sunday, April 28, 2013

Easy Homemade Soft Pretzels


Who would have thought you can make quick soft pretzels at home, no venturing to a crowded and loud mall required. You're probably thinking right now, yeah right making pretzels at home is sooo time consuming, what with making the dough, kneading the dough, the rising of the dough, the boiling of the dough, etc.  That's what I thought too! But due to some good fortune I stumbled across a blog that promised pretzel making would be simple and done in 30 minutes...."pshh, I gotta try this for myself", I thought. nom nom nom...excuse me, sorry im in the middle of finishing my 3rd preztel, and trying to type at the same time. 


Oh man, Sally's baking addiction wasn't kidding! These were some awesome and quick pretzels.  They were not only super fast to make, but there is no dough rising, no boiling, and barely any kneading involved. They were uber soft and I could barely contain myself when these bad boys came out of the oven. I wanted to stuff my face before I could even take photos, but then I snapped to it soon enough to realize if I ate all the pretzels immediately, then there would be none left to take pictures of... phew, close call. Once I took the pictures I then proceeded to stuff my face :)


 I hope you try these preztels for yourself, I was always a little intimidated with pretzel making but this recipe replaced all my fears and I cannot wait to try all sorts of different variations of pretzel flavors, like cinnamon and sugar, jalapeno, chocolate....the list goes on and on. 


30 Minute Homemade Soft Pretzels
Adapted from Sally's baking Addiction

Yields: 8-10 Pretzels

Ingredients

1 1/2 cups luke warm water
1 packet of highly active yeast (I used Fleischmann's)
1 teaspoon salt
1 tablespoon sugar
4 cups all purpose flour
1 large egg
course sea salt

Directions

-  Preheat the oven to 425 degrees and line a cookie sheet with parchment paper.
-  In a large bowl, pour in the warm water and yeast, stir with a spoon until the yeast is dissolved, about 1 minute. Add in the salt and sugar and stir until incorporated.
-  Slowly add in the flour about 1 cup at a time, mix with a wooden spoon until it gets sticky, continue to add in all your flour and at this point is when I started to use my hands to finish mixing the dough. The dough should no longer be sticky.
-  Knead the dough for about 5 minutes on a lightly floured surface, once kneaded, shape into a ball, with a knife or your hands separate the dough into about 1/3 cup sections, or use smaller or bigger sections depending on how large you want your pretzels.

Divide your dough into sections
-  Roll the dough into a long rope about 20 inches long and form the pretzel shape and place on your parchment paper.

-  In a shallow bowl beat your egg and dip the pretzel (both sides) into the egg wash and place back onto your parchment paper and sprinkle with sea salt.

Dipped in egg wash
-  Bake for 10 minutes at 425 degrees, and turn the oven to broil for the last 3-4 minutes until the tops of the pretzel are golden brown, be careful to keep an eye on the pretzels once you switch it to broil because it might take only a couple of minutes for your pretzels to brown depending on your oven.

This was left in 4 minutes once switched to broil

This was left in for 3 minutes once switched to broil


I link up to these awesome parties! including the newest addition Our Growing Edge over at Bunny Eats Design.  

Sunday, April 7, 2013

Kalamata Olive and Pesto Sandwich (Vegan Friendly) a.k.a Copycat Corfu Sandwich


Have you've ever had that favorite item on the menu that you would always order at a resturant and then once in a blue moon you would decide to try something different, and it just wasn't as good as your favorite or you were disappointed and wanted to kick yourself for ordering something different when you should have just gotten what you love? That was me everytime I didn't order this sandwich and try something different, I would always regret it.  


This is one of my all time, hands down favorite sandwiches in the whole wide world. I like to call this a copy cat version of the Corfu Sandwich from a awesome little cafe in Anchorage Alaska.  Before we left AK to live in Japan, we made sure we visited all of our favorite restaurants in Anchorage and took a menu from each place so we could recreate them at home.

Saturday, March 2, 2013

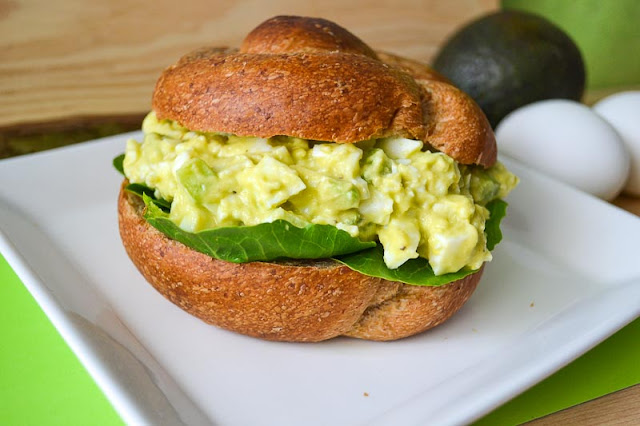
Avocado Egg Salad Sandwich


Ugghhh the weather outside is nasty today, the wind is whipping around, ice/snow is falling sideways, its just not pleasant to venture outside today.  I want spring and I want spring now! So I thought I would make a great spring sandwich and pretend that spring time is on its way and forget that we still    have 2 more months of winter here in Northern Japan :(
 You know what the best thing about spring is?.... Easter Candy! I love walking into the store and seeing aisles of easter candy stacked towards the celling.  My all time favorite, hands down, are the cadbury mini eggs, I could probably polish off a entire bag of them by myself.  It takes a lot of will power not to finish the bag in 1 day. 


  This spring time sandwich will not only have you thinking of spring, but it's a healthy alternative to your everyday egg salad.  There is only a small dollop of mayo and only half the egg yolk is used, the rest of your creaminess comes from the mashed avocado which is good for you because they are full of healthy fats. 


Avocado Egg Salad Sandwich
Recipe adapted from Skinny Taste
Yields: 2 servings

Ingredients

4 slices Whole Wheat Bread or 2 Whole Wheat egg twist rolls sliced in half
2 hard boiled eggs with yolks, diced
2 hard boiled egg, without yolks, diced
1 1/2 tablespoons miracle whip
1/2 avocado mashed
1/2 cup celery, diced (about 1 large stalk)
1 1/2 tablespoons apple cider vinegar
salt and pepper to taste

Directions

- In a Medium bowl mash together your avocado and egg yolks, add in the rest of your ingredients and mix until completely combined. Salt and pepper to taste.
- Toast your bread or roll and top with your acovado egg salad and enjoy.

It helps if you mash your avocado and yolk
in the bowl first before adding the rest
of the ingredients, I like to learn the hard way ;)


Monday, February 18, 2013

Triple Chocolate Marshmallow Cookies


Chocolate lovers unite! this cookie will satisfy any chocolate lovers craving. These cookies are chewy, soft, chocolaty and delicious. The marshmallow in the middle gives it that extra gooey component. 

I will admit the frist couple of batches were trail and error, I thought that I would just add the marshmallows to the batter and let them bake....big mistake not only did it create a huge mess  but the marshmallows that oozed out of the cookie started to burn and turned hard and crunchy. So on the third batch i decided to take all the marshmallows out of the batter, by hand :/  and once the baked cookies came out of the oven I pushed a marshmallow into the middle and SUCCESS!  The marshmallow slowly melted into the middle of the cookie and I finally had my triple chocolate marshmallow cookie. 


Triple Chocolate Marshmallow Cookies
Oishii Treat Original
Yields: 30 cookies

1 cup butter at room temp
2/3 cups white sugar
2/3 cups packed brown sugar
2 eggs
2 teaspoons vanilla extract
3/4 cup cocoa
1 teaspoon baking soda
1/2 teaspoon salt
2 cups flour
1 3/4 cups dark chocolate chips (one 8 oz bag)
1 cup marshmallows (you can use regular small marshmallows if you dont have chocolate ones and add as many to the middle of the cookie as you like, I added about 2 marshmallows in the middle of each hot cookie)

Directions

- Preheat the oven to 350 degrees
- Cream together the butter and sugars until full incorporated  add in your eggs and vanilla extract and beat until combined.
- Add in the cocoa mixture, baking soda and salt once fully combined add in the flour and mix until fully incorporated
- Hand mix in your chocolate chips.
- Roll a 1 inch ball of cookie dough and place on a cookie sheet 1 inch apart from the other.
- Bake for 10 minutes, once you remove the cookies from the oven push a marshmallow into the middle of the cookie and place on a wire rack to cool.


Sunday, February 3, 2013

Vegetarian Dippin Dogs


The Super Bowl game will air on Monday in Japan and even vegetarians like to have tail gate snackage and super bowl party food.  I thought this was a cool, easy, and fun way to make dippin dogs with the vegetarian links, paired with a jalapeno ketchup and mustard.  Plus the hot dogs are so tasty I doubt your meat eating friends will even care or know they're not beef or whatever mixture of animals are usually made with hotdogs.

We had to eat these dogs on Sunday (sat. stateside) because while the big game is going on Monday, we'll be on a ferry on our way to Sapporo to see the ice festival.  Can't wait to share some great pics from the ice festival and stuff myself with some delicious Japanese ramen. 


Vegetarian Dippin Dogs
Oishii Treat Original

Ingredients

1 Pkg pillsbury crescent rolls, 8 count
1 Pkg Smart Dogs
1 egg white


Directions

- Preheat your oven to 375 degrees
- Open your package of crescent rolls and along the pre-made dotted line separate your triangles.
- Place 1 dog on the skinny corner of the dough and roll towards the wider end of the triangle


- place on a greased or parchment paper lined cookie sheet and brush to tops with egg white and sprinkle with your favorite type of seasoning. I used garlic salt, red pepper flakes and italian seasoning


- Bake in the oven for 15 minutes or until the crescent rolls are nice and golden brown.

Jalapeno Pepper Ketchup

Ingredients

1/3 cup ketchup
1-2 tablespoons pickled jalapeno, diced small
1 tablespoon of the juice from the jar of pickled jalapenos.

Directions

Combine all ingredients in a small bowl.


Monday, January 21, 2013

CrockPot Dulce De Leche


Wow where did the time go? I can't believe I've been MIA for 2 weeks. All I have to say work has been craZy this month.  With my paralegal duties, cub scouts and studying a girl barley has time to cook. Ooooh yeah, geez totally forgot, did I mentioned I caught a Japanese stomach virus 2 weeks ago as well, right about that time I had my terrible snow boarding trip. I guess that stomach bug I was coming down with wasn't just a normal 24 hour bug. After struggling for 3 days with terrible stomach pains, nausea, heart burn and acid reflux I finally went to the emergency room on base and 4 hours later I found out that there has been a epidemic in Japan concerning a stomach virus / infection and this lucky red head had caught it. Winner right here.  
So my prize for the last 2 weeks has been trying to get rid of this awful virus.  I'm still battling some acid reflux and heart burn but after changing my diet a little and watching how late I eat at night its been getting better. So now I can finally get back in the kitchen and start whipping up some delightful treats. 


 I want to share this super easy and can't stop eating it by the spoon Dulce De Leche.  I have many plans for this gooey, sticky, sweet sauce. My next post will be a samoa girl scout cookie inspired cupcake featuring dulce de leche. But for now its a good thing I made a couple of jars of this stuff, cause it's great in coffee, ice cream and for a healthier option you can dip sliced apples in it.

So just dig your cock pot out of the cupboard place your jars in it and let it cook overnight while your dreaming of all the delicious ways you can use dulce de leche....I know I did :)


CrockPot Dulce De Leche
Adapted From Buns in my Oven

Ingredients
2 (14oz) cans sweetened condensed milk
2 or 3 half pint canning jars or reuse the glass jars your condiments come in (I used a jelly jar and hummus glass jar that I washed and saved weeks ago)


Directions

- Pour your sweetened condensed milk into your glass jars and secure the lids tightly to the jars.
- Place the jars in your crock pot and add water.  The water should rise at least 1 inch above your jars.


- Place the lid on the crock pot and set on low heat.
- Cook for 10-12 hours the longer you cook the sauce the darker in color it will get.
- Remove the jars from the water and let cool to room temp, they can be stored in the refrigerator up to 3 to 4 weeks (if they last that long)


I link up to these fun parties 


Sunday, January 6, 2013

French Toast Cupcakes w/ Maple Buttercream


   So I went on my first snowboarding trip in Japan and probably my last.  Snowboarding is just not meant for me, I'am a firm believer that its just one of those sports you need to start as a kid, where a couple of falls on your butt won't jack up your already bad back and leave bruises from head to toe.  

Oh did I mention that I also fell off the ski lift :/  I was so afraid of the lifts to begin with because they don't stop for you, they just scoop you up and you pray your in the right position when it arrives. So as it happened yesterday I wasn't in the right positon and that lift just knocked me off with no sympathy, I felt like I was punched in the hip by a sumo wrestler. 

I guess this really is my fault,  I should have known what to expect when I had my first true experience snow boarding in Alaska 4 years ago and ended up with a minor concussion, I should have known my second chance snow boarding in Japan wouldn't be any different.  It took about 2 hours to get down the mountain and I hurt my back so bad and was starting to come down with a stomach bug that I decided to throw in the towel and take a nap on a small love seat in a hotel lounge while the rest of the people on the trip were still snowboarding and the hubby went to the onsen. Oh well


After a day of being beaten up and feeling my age I decided that I owed my self a treat and made my favorite breakfast in a cupcake form.  These babies will not disappoint they literally taste like french toast with a delicious maple buttercream.  


French Toast Cupcakes
Adapted from Bakingdom
Yields: 24-28 cupcakes


For the Streusel 
Ingredients

1/2 cup brown sugar, packed
1 tablespoon sugar
1/2 cup flour
1/2 teaspoon cinnamon
1/4 teaspoon salt
5 tablespoons cold unsalted butter, sliced into chunks

Cupcake

3 cups flour
1 1/2 cups sugar
1 tablespoons baking powder
2 teaspoons cinnamon
1/2 teaspoons nutmeg
1 teaspoon salt
1 cup (2 sticks) unsalted butter, at room temperature
1 cup sour cream
4 eggs
1 tablespoon vanilla extract

Directions for Streusel

In a medium bowl, combine the dry ingredients and add in the cold butter using your hands to mix and squeeze the mixture together crumbling it up.  once complete cover and place in the freezer until ready to top on the batter.

Directions for the Cupcakes

Preheat the oven to 350 degrees and line your cupcake tins with paper liners; set aside.
In your electric mixer bowl add your flour, sugar, baking powder, cinnamon, nutmeg, and salt and whisk on low speed until mixed together.  Add in your butter, sour cream  eggs and vanilla, mix well until combined and smooth about 30-45 seconds.
Place 3 tablespoons of batter into each baking cup. and divide the streusel evenly among the cupcakes and top about 1 spoonful of streusel on top of each baking cup. Bake for 18 minutes or until toothpick inserted in the middle comes out clean.
Before they're baked


Before they're baked


After they're baked
Maple Buttercream

Ingredients

1 cup butter unsalted at room temperature
4 cups powdered sugar
1 1/2 teaspoons vanilla extract
1/2 teaspoon salt
1/3 cup maple syrup (your favorite kind, I used Mrs. Butterworth)
2 tablespoons heavy cream

Directions

In a electric mixer, beat the butter on high speed until light and fluffy, (this could take a little time about 8 to 10 minutes).
This is what the butter should look like, almost looks like fluff or whipped cream

Beat in the powdered sugar 1/4 cup at a time until all the powdered sugar has been incorporated
Add the vanilla, salt and syrup and mix until combined. Beat in the heavy cream and whisk on high for 4 minutes.


I linked up to these fun linky parties 
Related Posts Plugin for WordPress, Blogger...