Saturday, March 9, 2013

Fresh Strawberry Dream Cupcakes with Fresh Strawberry Buttercream


Today was a big day, not only was it my mama's birthday (Love you mom!) a co-workers babyshower, its also my blog anniversary. I started my little blog last year to share my love of food with anyone else who was willing to stop by and listen. I've met a lot of amazing people through blogging and been inspired to keep making new and fun dishes to share. I'm pretty proud of myself to actually stick with this project for the last year, I thought I might give it up or work would be too busy and I would have to  stop blogging after a few months, but honestly I would always find myself searching, thinking and creating the next recipe I was going to make and share. 


 Everyone in my office believes that these are the best cupcakes I've made so far, I actually saw one of my friends eat 3 cupcakes in 20 minutes, he said they were that good. I tell you the fresh strawberries combined with the delicious creamy buttercream is a dynamite combo.  It was seriously hard to resist eating the batter and buttercream by the spoonfuls while making these, but I made it through with just the wee tiny amount of batter and buttercream missing from the bowl ;) seriously though if you want to try a fruit cupcake you need to make these. The cake part is moist and not to sweet and loaded with fresh strawberries, the buttercream is velvety and creamy with the help of strawberry milk......
So good!
The BEST EVER strawberries I have ever eaten, there is something
special about the soil in Japan. 


Fresh Strawberry Dream Cupcakes with Fresh Strawberry Buttercream
Adapted from Brown Eyes Baker

Yields: 36 cupcakes

Ingredients

2 3/4 cups flour
1/2 cup cake flour
1 tablespoon baking powder
1 teaspoon salt
1 cup unsalted butter, at room temp
2 cups sugar
1 1/2 teaspoon vanilla extract
3 eggs
1 egg white
1 cup 2% milk
2 cups fresh finely diced strawberries

Directions

- Preheat the oven to 350 degrees and line your cupcake pans with paper liners.
- In a medium bowl combined your flour, cake flour, baking powder and salt, whisk together and set aside.
- In a electric mixer on medium high speed, cream together the butter and sugar, until light and fluffy about 3-5 minutes.
- Add in your extract and Add in the eggs one at a time, mixing each egg in with the butter and sugar completely before adding the next egg.
- Reduce your speed to low and add in the milk and flour ingredients in 2 batches starting with the flour and alternating with the milk, mix until combined.
- Fold in your diced strawberries in the batter with a spatula and using a large spoon or ice cream scoop fill your paper lines 3/4 full.
- Bake for 18-20 minutes or until a toothpick inserted in the middle comes out clean.
- Remove from oven and cool on a wire rack.

Fresh Strawberry Buttercream
Oishii treats

Ingredients

1 cup strawberry milk, I used nesquick
5 tablespoons flour
1 cup butter, at room temp
1 cup sugar (not powdered)
1 cup diced finely, strawberries

Directions

- Using a small stove top pot add in your strawberry milk and place heat on high, add in your flour and whisk until the mixture starts to thicken, about 2-3 minutes.
- Keep whisking the mixture for another 1-2 minutes until its thick and has the consistency of pancake batter or cake batter. Remove from heat and immediately transfer the mixture to a ramekin or bowl and let cool to room temp. Takes about 30-40 minutes.

- In a electric mixture beat the butter and sugar together for 7-8 minutes on high, the mixture should be white and fluffy. Beating the butter and sugar together for this amount of time will help the sugar dissolve better.

- Add in your cooled milk mixture and whip on high for another 4-5 minutes, the sugar should almost if not be basically dissolved. If it is still slightly grainy the sugar should still dissolve the rest of the way when you pipe it on the cupcake.


- Fold in your diced strawberries and using a pipping bag with a large tip, pipe onto your cupcakes. They will keep for 1-2 days in a air tight container.


I link up to these awesome parties.

Saturday, March 2, 2013

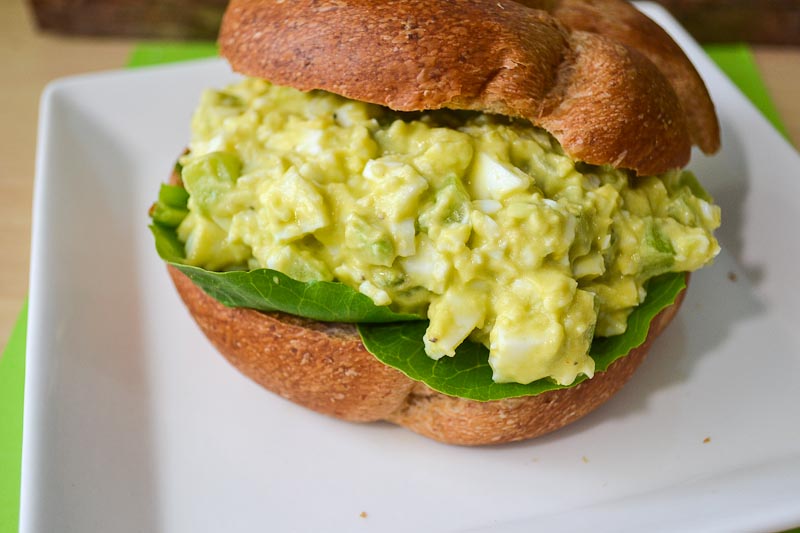
Avocado Egg Salad Sandwich


Ugghhh the weather outside is nasty today, the wind is whipping around, ice/snow is falling sideways, its just not pleasant to venture outside today.  I want spring and I want spring now! So I thought I would make a great spring sandwich and pretend that spring time is on its way and forget that we still    have 2 more months of winter here in Northern Japan :(
 You know what the best thing about spring is?.... Easter Candy! I love walking into the store and seeing aisles of easter candy stacked towards the celling.  My all time favorite, hands down, are the cadbury mini eggs, I could probably polish off a entire bag of them by myself.  It takes a lot of will power not to finish the bag in 1 day. 


  This spring time sandwich will not only have you thinking of spring, but it's a healthy alternative to your everyday egg salad.  There is only a small dollop of mayo and only half the egg yolk is used, the rest of your creaminess comes from the mashed avocado which is good for you because they are full of healthy fats. 


Avocado Egg Salad Sandwich
Recipe adapted from Skinny Taste
Yields: 2 servings

Ingredients

4 slices Whole Wheat Bread or 2 Whole Wheat egg twist rolls sliced in half
2 hard boiled eggs with yolks, diced
2 hard boiled egg, without yolks, diced
1 1/2 tablespoons miracle whip
1/2 avocado mashed
1/2 cup celery, diced (about 1 large stalk)
1 1/2 tablespoons apple cider vinegar
salt and pepper to taste

Directions

- In a Medium bowl mash together your avocado and egg yolks, add in the rest of your ingredients and mix until completely combined. Salt and pepper to taste.
- Toast your bread or roll and top with your acovado egg salad and enjoy.

It helps if you mash your avocado and yolk
in the bowl first before adding the rest
of the ingredients, I like to learn the hard way ;)


Sunday, February 24, 2013

Carrot Cake Cupcakes


I love me some veggies in my cupcakes, who doesn't!  Its a great way to sneak in some vegetables and not feel so guilty eating a delicious cupcake or 2 ;)....okay who am I kidding, there's not that much veggies in a carrot cake cupcake, it would be better if you just ate a carrot.  But at least you dont feel as guilty eating carrot cake as you would say a chocolate cupcake :)  

I made these moist and delicious cupcakes for a birthday party last night, paired with a slightly tangy lemon cream cheese frosting it was the perfect addition that put these cupcakes over the top and made them a huge hit at the party.


Carrot Cake Cupcakes
Adapted from Paula Deen

Yields 24-28 cupcakes

Ingredients 

2 cups flour
1 3/4 cups sugar
2 teaspoons baking soda
2 teaspoons cinnamon
1 teaspoon salt
4 eggs
1 1/2 cups canola oil
3 cups grated carrots

Directions

- Preheat oven to 350 degrees, and line your cupcake pans with 24 liners
- In a electric mixer combined your flour, sugar, baking soda, cinnamon and salt and mix together on low for 30 seconds.
- Add in your oil and eggs and mix until completely combined
- Mix in your grated carrot and mix until fully combined into the batter.
- Using a ice cream scoop, fill your cupcake liners 3/4 full and bake for 17 minutes or until a toothpick comes out clean, remove from oven and cool on a wire rack.


Lemon Cream Cheese Frosting

Ingredients

6 tablespoons butter, at room temp 
12 tablespoons cream cheese, cold
1 tablespoon lemon juice
4 cups powdered sugar

Directions

- In a electric mixer beat the butter and cream cheese together until smooth and fluffy, about 5 minutes.
- Add in the lemon juice and slowly 1/4 cup at a time add in the powdered sugar until all of the powdered sugar is completely incorporated. 
- Beat the frosting for another 2-3 minutes and pipe onto your cupcakes.


Monday, February 18, 2013

Triple Chocolate Marshmallow Cookies


Chocolate lovers unite! this cookie will satisfy any chocolate lovers craving. These cookies are chewy, soft, chocolaty and delicious. The marshmallow in the middle gives it that extra gooey component. 

I will admit the frist couple of batches were trail and error, I thought that I would just add the marshmallows to the batter and let them bake....big mistake not only did it create a huge mess  but the marshmallows that oozed out of the cookie started to burn and turned hard and crunchy. So on the third batch i decided to take all the marshmallows out of the batter, by hand :/  and once the baked cookies came out of the oven I pushed a marshmallow into the middle and SUCCESS!  The marshmallow slowly melted into the middle of the cookie and I finally had my triple chocolate marshmallow cookie. 


Triple Chocolate Marshmallow Cookies
Oishii Treat Original
Yields: 30 cookies

1 cup butter at room temp
2/3 cups white sugar
2/3 cups packed brown sugar
2 eggs
2 teaspoons vanilla extract
3/4 cup cocoa
1 teaspoon baking soda
1/2 teaspoon salt
2 cups flour
1 3/4 cups dark chocolate chips (one 8 oz bag)
1 cup marshmallows (you can use regular small marshmallows if you dont have chocolate ones and add as many to the middle of the cookie as you like, I added about 2 marshmallows in the middle of each hot cookie)

Directions

- Preheat the oven to 350 degrees
- Cream together the butter and sugars until full incorporated  add in your eggs and vanilla extract and beat until combined.
- Add in the cocoa mixture, baking soda and salt once fully combined add in the flour and mix until fully incorporated
- Hand mix in your chocolate chips.
- Roll a 1 inch ball of cookie dough and place on a cookie sheet 1 inch apart from the other.
- Bake for 10 minutes, once you remove the cookies from the oven push a marshmallow into the middle of the cookie and place on a wire rack to cool.


Saturday, February 9, 2013

Chocolate Chip Banana Cake

I've had a nice short vacation this week, just what I needed to recharge for the next couple of months of courts, school and volunteer work. We spent the first 3 days in Sapporo Japan experiencing the extreme cold and the snow/ice festival. 
I gotta say you know the one thing that's a little unnerving about living in Japan? the amount of earthquakes and tsunami warnings we get.  Try being on a ferry off the coast of Japan for 8 hours with a tsunami warning flashing on the t.v constantly.  In Japan the minute there's an earthquake there will usually be a tsunami warning that follows, so they will put a small map of japan on the lower corner of every t.v. channel flashing either yellow or red with what areas are in potential danger for a tsunami.  Totally didn't calm me nerves while I was on the ferry for 8 hours, so i decided to turn off the tv and sleep until we reached our destination.   Thank goodness the boat ride was smooth and uneventful. The last few days this week have been spent at home unwinding and making some delicious recipes. I also wanted to share some pictures from Saporro Ice Festival, this is the biggest ice and snow festival in Japan.


Those are real fish and crabs in the ice
The snowboarding ramp was built right in the middle of the city in Odori Park

My Favorite snow sculpture and you can even see the guy on top still working on it


Back to the food, this is a nice healthy banana cake with coconut oil replacing the butter, some rolled oats added to the batter for fiber and of course gotta have some mini chocolate chips for a little indulgence. 


I had some extremely rippen bananas that needed to be put to good use, I also wanted an excuse to use a cake pan and test my new cloth baking strips to see if they actually work, they are supposed to go around the outside of your cake pan and they help the cake bake even with a flat surface instead of a dome shape.  I was pleasantly surprised that the cake came out pretty even, the strip prevented the sides from becoming to overly cooked and hard and for the most part the cake came out flat, with just a very slight dome.  If I didn't use the strips I know the cake would have came out with a larger dome. 


Chocolate Chip Banana Cake
Oishii Treat Original

Ingredients 

1 1/4 flour
1/2 teaspoon baking soda
1/8 teaspoon salt
1/2 teaspoon cinnamon
1/8 teaspoon ground ginger
1/8 teaspoon ground nutmeg
1/3 cup old fashioned rolled oats
1/3 cup coconut oil
1/2 cup packed brown sugar
2 ripe bananas mashed
1 egg
1/2 teaspoon vanilla extract
2 tablespoons skim milk
1/3 cup mini chocolate chips

Directions

- Preheat oven to 350 degrees, line a 8 inch cake pan with parchment or wax paper and spray with baking or cooking oil on the sides of the pan. (to prevent the cake to sticking to the sides)
- In a small bowl combined your dry ingredients flour, baking soda, spices and oats and whisk until mixed together.
- In a electric mixer cream together the coconut oil and brown sugar, add in your egg, vanilla extract and mashed bananas. Mix until combined.
- Add half the dry ingredients + 1 tablespoon milk to your wet mixture and mix till combined. Add in the rest of the dry ingredients with the other tablespoon of milk and mix until the batter is fully combined.
- Hand stir in your chocolate chips and pour the batter into the cake pan and level in out with a spatula.
- Bake for 35-40 minutes and remove from oven and let cool on a wire rack for 15 minutes, remove cake from pan and let cool to room temp. or serve warm with some whipped cream and a tall glass of milk.


I link up to these fun parties 

Related Posts Plugin for WordPress, Blogger...