Showing posts with label breakfast. Show all posts

Wednesday, October 2, 2013

Kabocha Squash Coffee Cake


Squash is an awesome versatile vegetable, wouldn't you agree? It can sit on your counter for weeks and wont go bad, it can be added to everything from soups, casseroles, and even baked goods.  I even used squash as the sauce in mac n cheese and it was a-ma-zing!  I don't know why it took me this long to start using squash....oh ya maybe because the commissary charges over $6 bucks for any type of squash, it wasn't till I ventured off base and started shopping for my produce at the local Japanese farmers market that I realize how cheap squash really is.  The same sized squash I buy on base for over $6 dollars I can get off base for under $2 bucks, crazy right.  


I've been stocking up on squash and searching for a wide variety of recipes to start using it, not only is it cheap, its super hearty for vegetarians, full of fiber and vitamins and it can be added to every dish.   I recently used the Kabocha squash (Japanese pumpkin squash) in a chickpea stew, mac n cheese and now this delicious coffee cake.  Whats great about Japanese pumpkin squash is that it taste a lot like the normal orange pumpkin you can buy for Halloween.  Its slightly sweet, a pain in the ass to cut though and orange in color.  I've been making a lot of dishes lately with pumpkin and have turned a pumpkin hater co-worker into a pumpkin lover now, especially after she tried this coffee cake, her mom even wanted to recipe :) When a mom wants your recipe you know you got something special.


Next time, I'll be doubling the crumb mixture because you can never had enough added to the top.


Kabocha Squash Coffee Cake
Servings: 10-12 

Ingredients

Crumb Mixture

1/4 cup packed brown sugar
1/4 cup sugar
1/4 cup flour
1/4 cup cooking oats
1 teaspoon cinnamon
3 tablespoons cold un salted butter

Directions

1.  Add all the dry ingrentins into a bowl and mix until combined,
2.  Cut in your cold butter and mix until the mixture is crumbly. I find that using a fork helps or just my hands. Set the bowl aside when finished.

Cake

1/2 cup butter flavored shortening
3/4 cup sugar
2 eggs
1 cup mashed cooked kabocha squash (or any othre sweet squash like pumpkin or butternut)
1 teaspoon vanilla extract
2 cups flour
2 teaspoons baking powder
1 teaspoon cinnamon
1/2 teaspoon baking soda
1/2 teaspoon salt
1/2 teaspoon ground ginger
1/2 teaspoon ground nutmeg
A pinch of ground cloves
1/2 cup unsweetned applesauce

Directions

1.  Preheat your oven at 350 degrees and grease a 9-in springform pan. 
2.  In a medium bowl combined your dry ingredients: flour, baking powder, cinnamon, baking soda, ginger, nutmeg,   and clove. whisk until combined and set aside.
3.   In an electric mixer cream together the shortening and sugar on high until light and fluffy, about 3 min.
4.  Beat in the eggs, one at a time, beating well after each addition.
5.  Beat in the squash and vanilla.
6.  Gradually add in your dry ingredients into the creamed mixture until fully combined.
7.  Spoon half of your batter into the greased sprinform pan, using the back of a spoon to help spread it evenly.
8.  Spread your appleasauce over the batter in the pan and sprinkle with half of the crumb mixture.
9.  Spread the remaming batter over the applesauce/crumb mixture, using the back of a spoon again to help spread it evenly.  Add the remaining crumb mixture to the top.
10.  Bake for 50-55 minutes or until a toothpick inserted comes out clean. (FYI my oven bakes fast so it was done early. around the 40-45 min mark. so test your cake early.)
11.  Cool for 10 minutes before removing the sides of the pan. Makes about 10-12 servings.

Recipe adapted from Taste of Home


Sunday, August 4, 2013

Crumb Coffee Cake


Its good to be home and back in my kitchen ~ But I think I'm going to need another vacation from my recent vacation.

When we set out for our trip 3 weeks ago to the states to visit family I had not fully prepared myself with the amount of traveling we decided to cram into 3 weeks.  I'm still in disbelief on how many miles we drove, walked and even rowed.  We easily covered over 1500 miles, traveling to 4 different states and another country (Canada).

The best highlights of the trip were starting off in New York City for 2 nights where we walked  10 miles of Manhattan to eat at the "first" pizza place Lombardi's, checked out the Empire State Building, visited the Space Shuttle Enterprise at the Intrepid Museum, by the way free for active duty :) and hitched a ferry ride to Staten Island to catch a glimpse of the statue of Liberty.  After leaving NYC we picked up our car in Syracuse and headed south to Pennsylvania to Hersey Park and went to a Dave Matthews Concert (totally awesome!), then headed up towards Scranton to visit my brother in-law, his gf and our niece for the first time.  (This was the first 5 days)

The best bagel cream cheese in Lox in all of NY
Intrepid Museum 


Biggest Ladder Back Chair in the world
Dave Matthews 


After our time in PA we drove to Vermont to visit family, play some disc golf and had fish in chips in 
Massachusetts with Grandma.  Took a detour to Lake George and camped out for 3 nights on a island in the middle of the lake, did a little kayaking, cliff jumping (small cliff), tubing, watched an amazing electric storm on the lake..oh and was savagely attacked by mosquitos.  We kept traveling north for  a reunion in Plattsburg NY later that evening went even further north to Montreal Canada where we stayed in the historic part of downtown in a cute little hotel watching fireworks from the bridge, walking the entire city checking out local shops and restaurants and trying putine for the first time, which by the way is fries smothered in gravy and topped with cheese curds...delicious!! (All this in week 2)

Putine
Cliff Jumping Lake George 


Birds eye view of Montreal 


After our stay in Canada we left to meet up with my father in-law at his camp in the Andirondacks where we stayed a couple of nights, went canoeing, boating and thrift shopping. the last leg of our journey we headed back to Syracuse to catch up on sleep, laundry and more sleep before leaving to go back to Japan.

 All in all it was a very successfully trip, we saw a lot of family that we haven't seen an a couple of years, our rental car never gave us issues and for the most part we didn't get lost when driving all over the northeastern side of the country.

Now to the food, I made this coffee cake before I left on vacation, some co-workers were craving it, this recipe came out amazing, very light, sweet and the huge brown sugar crumbles are delicious, they were my favorite part.  Place this cake soaks up coffee like a sponge.


Crumb Coffee Cake

Adapted from Sally's baking addiction

1 Tablespoon Flour, to coat the pan
2 cups flour
1 cup sugar
1 teaspoon salt
10 tablespoons cold butter, lightly softened in the microwave for 20 seconds
1 teaspoon baking powder
1/2 teaspoon baking soda
3/4 cup buttermilk
1 large egg
2 teaspoon vanilla extract
2/3 cup packed brown sugar
2 teaspoons cinnamon

Directions

1. Preheat oven to 350 degrees, spray a 9 inch springform pan with cooking spray and sprinkle the bottom of the pan with flour, tapping out excess flour.

2. Whisk the flour, sugar, salt together in a large bowl until combined.  Cut the butter into 1 tablespoon sized pieces and using your hands or a fork mix/mash together the butter and dry ingredients until it resembles a crumbly mixture. scoop out 1 cup of the mixture and set it aside.

3. Transfer the rest of the ingredients from the large mixing bowl into an electric mixer (the batter is going to be very thick and the mixer helps a lot) Add in the baking soda and powder and mix together for 1 minute. Add in the buttermilk, egg, vanilla and mix everything together on medium high speed for about 2 minutes until smooth and fluffy, the batter will look kinda of like frosting, pour the batter into the springform pan and using a spatula smooth the top of the batter until even in the pan.

4. Using your empty large mixing bowl add in the reserved 1 cup of flour mixture and add in the brown sugar and cinnamon, using a fork or your hands crumble up the ingredients together making course crumbs. Sprinkle the crumbs over the batter, pressing lightly so the crumbs stick to the batter.

5.  Bake for 50-55 minutes (mine took 50) or until a toothpick inserted in the middle comes out clean, allow to cool on a wire rack for about 10 minutes, remove the side of the springform pan and cool completely to room temp.


Sunday, April 21, 2013

Gotta Love Coconut Oil: Strawberry Banana Muffins w/ Streusel Topping


I've been on a mission lately to dust off some of my kitchen gadgets and pans I've bought months ago and finally let them complete their mission in life. 

I've have this jumbo muffin pan, which has been sitting in the back of the cabinet underneath the multiple loaf pans, regularly used cupcake tins, and donut pans.  Just sitting there sad and lonely, and I started to feel sorry for it.  I know I know it sounds silly, why should I feel sorry for a inanimate object.  But I do, becuase why bother buying something if you aint going to use it, then your just wasting money and taking up space in your tiny kitchen that can barley hold all the kitchen crap you've already accumulated over the years....am I right?  


So today was the day the jumbo muffin tin was going to have its day in the oven. I adapted my nanas banana bread recipe and came up with one hell of an oishii muffin.  I love using coconut oil in place of butter or vegetable oil, not only is it better and healthier for you but it gives the baked goods an extra special flavor that you wouldn't get with butter or vegetable oil.  These Jumbo muffins are great for breakfast along with a cup of coffee or as a snack. They are loaded with fruit and incredible moist, thanks to the rippend bananas, greek yogurt and coconut oil. You got to give these a try, if you're not a strawberry fan then you can easily switch out the strawberries for blueberries, raspberries or just use bananas. 
Now go save a lonely unused kitchen gadget or pan today and you'll be happy you did.

Saturday, February 9, 2013

Chocolate Chip Banana Cake

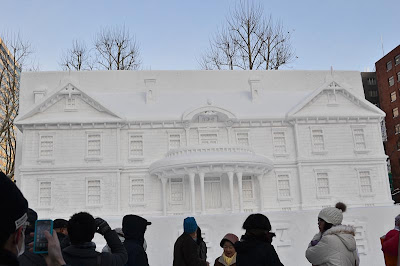
I've had a nice short vacation this week, just what I needed to recharge for the next couple of months of courts, school and volunteer work. We spent the first 3 days in Sapporo Japan experiencing the extreme cold and the snow/ice festival. 
I gotta say you know the one thing that's a little unnerving about living in Japan? the amount of earthquakes and tsunami warnings we get.  Try being on a ferry off the coast of Japan for 8 hours with a tsunami warning flashing on the t.v constantly.  In Japan the minute there's an earthquake there will usually be a tsunami warning that follows, so they will put a small map of japan on the lower corner of every t.v. channel flashing either yellow or red with what areas are in potential danger for a tsunami.  Totally didn't calm me nerves while I was on the ferry for 8 hours, so i decided to turn off the tv and sleep until we reached our destination.   Thank goodness the boat ride was smooth and uneventful. The last few days this week have been spent at home unwinding and making some delicious recipes. I also wanted to share some pictures from Saporro Ice Festival, this is the biggest ice and snow festival in Japan.


Those are real fish and crabs in the ice
The snowboarding ramp was built right in the middle of the city in Odori Park

My Favorite snow sculpture and you can even see the guy on top still working on it


Back to the food, this is a nice healthy banana cake with coconut oil replacing the butter, some rolled oats added to the batter for fiber and of course gotta have some mini chocolate chips for a little indulgence. 


I had some extremely rippen bananas that needed to be put to good use, I also wanted an excuse to use a cake pan and test my new cloth baking strips to see if they actually work, they are supposed to go around the outside of your cake pan and they help the cake bake even with a flat surface instead of a dome shape.  I was pleasantly surprised that the cake came out pretty even, the strip prevented the sides from becoming to overly cooked and hard and for the most part the cake came out flat, with just a very slight dome.  If I didn't use the strips I know the cake would have came out with a larger dome. 


Chocolate Chip Banana Cake
Oishii Treat Original

Ingredients 

1 1/4 flour
1/2 teaspoon baking soda
1/8 teaspoon salt
1/2 teaspoon cinnamon
1/8 teaspoon ground ginger
1/8 teaspoon ground nutmeg
1/3 cup old fashioned rolled oats
1/3 cup coconut oil
1/2 cup packed brown sugar
2 ripe bananas mashed
1 egg
1/2 teaspoon vanilla extract
2 tablespoons skim milk
1/3 cup mini chocolate chips

Directions

- Preheat oven to 350 degrees, line a 8 inch cake pan with parchment or wax paper and spray with baking or cooking oil on the sides of the pan. (to prevent the cake to sticking to the sides)
- In a small bowl combined your dry ingredients flour, baking soda, spices and oats and whisk until mixed together.
- In a electric mixer cream together the coconut oil and brown sugar, add in your egg, vanilla extract and mashed bananas. Mix until combined.
- Add half the dry ingredients + 1 tablespoon milk to your wet mixture and mix till combined. Add in the rest of the dry ingredients with the other tablespoon of milk and mix until the batter is fully combined.
- Hand stir in your chocolate chips and pour the batter into the cake pan and level in out with a spatula.
- Bake for 35-40 minutes and remove from oven and let cool on a wire rack for 15 minutes, remove cake from pan and let cool to room temp. or serve warm with some whipped cream and a tall glass of milk.


I link up to these fun parties 

Sunday, January 6, 2013

French Toast Cupcakes w/ Maple Buttercream


   So I went on my first snowboarding trip in Japan and probably my last.  Snowboarding is just not meant for me, I'am a firm believer that its just one of those sports you need to start as a kid, where a couple of falls on your butt won't jack up your already bad back and leave bruises from head to toe.  

Oh did I mention that I also fell off the ski lift :/  I was so afraid of the lifts to begin with because they don't stop for you, they just scoop you up and you pray your in the right position when it arrives. So as it happened yesterday I wasn't in the right positon and that lift just knocked me off with no sympathy, I felt like I was punched in the hip by a sumo wrestler. 

I guess this really is my fault,  I should have known what to expect when I had my first true experience snow boarding in Alaska 4 years ago and ended up with a minor concussion, I should have known my second chance snow boarding in Japan wouldn't be any different.  It took about 2 hours to get down the mountain and I hurt my back so bad and was starting to come down with a stomach bug that I decided to throw in the towel and take a nap on a small love seat in a hotel lounge while the rest of the people on the trip were still snowboarding and the hubby went to the onsen. Oh well


After a day of being beaten up and feeling my age I decided that I owed my self a treat and made my favorite breakfast in a cupcake form.  These babies will not disappoint they literally taste like french toast with a delicious maple buttercream.  


French Toast Cupcakes
Adapted from Bakingdom
Yields: 24-28 cupcakes


For the Streusel 
Ingredients

1/2 cup brown sugar, packed
1 tablespoon sugar
1/2 cup flour
1/2 teaspoon cinnamon
1/4 teaspoon salt
5 tablespoons cold unsalted butter, sliced into chunks

Cupcake

3 cups flour
1 1/2 cups sugar
1 tablespoons baking powder
2 teaspoons cinnamon
1/2 teaspoons nutmeg
1 teaspoon salt
1 cup (2 sticks) unsalted butter, at room temperature
1 cup sour cream
4 eggs
1 tablespoon vanilla extract

Directions for Streusel

In a medium bowl, combine the dry ingredients and add in the cold butter using your hands to mix and squeeze the mixture together crumbling it up.  once complete cover and place in the freezer until ready to top on the batter.

Directions for the Cupcakes

Preheat the oven to 350 degrees and line your cupcake tins with paper liners; set aside.
In your electric mixer bowl add your flour, sugar, baking powder, cinnamon, nutmeg, and salt and whisk on low speed until mixed together.  Add in your butter, sour cream  eggs and vanilla, mix well until combined and smooth about 30-45 seconds.
Place 3 tablespoons of batter into each baking cup. and divide the streusel evenly among the cupcakes and top about 1 spoonful of streusel on top of each baking cup. Bake for 18 minutes or until toothpick inserted in the middle comes out clean.
Before they're baked


Before they're baked


After they're baked
Maple Buttercream

Ingredients

1 cup butter unsalted at room temperature
4 cups powdered sugar
1 1/2 teaspoons vanilla extract
1/2 teaspoon salt
1/3 cup maple syrup (your favorite kind, I used Mrs. Butterworth)
2 tablespoons heavy cream

Directions

In a electric mixer, beat the butter on high speed until light and fluffy, (this could take a little time about 8 to 10 minutes).
This is what the butter should look like, almost looks like fluff or whipped cream

Beat in the powdered sugar 1/4 cup at a time until all the powdered sugar has been incorporated
Add the vanilla, salt and syrup and mix until combined. Beat in the heavy cream and whisk on high for 4 minutes.


I linked up to these fun linky parties 

Tuesday, December 25, 2012

Gingerbread Cinnamon Roll Pancakes


The hubby requested pancakes for christmas breakfast and I wanted to find something different then your basic pancake.  I happen to stubble upon a recipe for cinnamon roll pancakes which led me to another recipe for gingerbread cinnamon roll pancakes and it being x-mas and all I had to go with the gingerbread.... of course :) 
These pancakes were awesome, they not only tasted delicious but when you flip the pancake over to cook the swirl side and flip it back, it looks just like a cinnamon roll on top. The only thing is, I wish I could have shared these yummy pancakes with my family for christmas.  Though I can be happy that at least me and my husband can spend the holidays together instead of being deployed this year. I adapted this recipe a little since I didn't have all the ingredients it called for, and they still turned out superb!  and looked pretty cool too. 

Gingerbread Cinnamon Roll Pancakes 
Adapted from Recipe Girl
Yields: 6-8 pancakes
Prep: 15 minutes  Cook: 20 minutes

Ingredients

Cinnamon filling

1/4 cup butter
1/2 cup packed brown sugar
1/2 tablespoon ground cinnamon
1/4 teaspoon ground nutmeg
1/4 teaspoon ground cloves

Pancake

3/4 cup milk
2 tablespoons brewed coffee
2 tablespoons dark mollasses
2 tablespoons water
1 large egg
1 1/4 cup flour
1/2 tablespoons ground cinnamon
1/2 tablespoons ground ginger
1/2 tablespoons ground baking powder
1/4 teaspoon baking soda
1/4 teaspoon salt

Directions

Prepare the cinnamon filling before you make the pancakes.
- In a small bowl melt the butter in the microwave, takes about 20 - 40 seconds.
- Mix in the brown sugar and spices with a whisk, make sure that the mixture is combined well and not lumpy.
- Scoop the mixture into a small ziplock baggy and set aside (while your making the pancake batter the mixture will cool and thicken up a little)

Prepare the batter

- In a large bowl, whisk together the milk, coffee, molasses, water and egg.
- In a small bowl combine all the dry ingredients and mix well.
- Add your dry ingredients to the wet ingredients and mix till just combined. (don't over mix its okay if they are some lumps in the batter)

Cooking the pancakes

- Set your oven to warm or 200 degrees and add a pan into the oven, use this as a warmer tray for placing your cooked pancakes in, to keep warm while finishing the entire batter.
- Preheat a large skillet on medium heat and spray the pan with cooking spray
- Scoop a 1/3 measuring cup of batter into the skillet and spread it around a little to make a round shape
 - Take your zip lock baggy and cut a small hole in the corner and pipe a swirl onto your pancake.
- Cook the pancake for about 3 minutes until you start seeing bubbles on the side of the pancake, flip the pancake over and cook the swirl side for about 2 minutes, dont worry if you see some of the swirl mixture oozing out from under the pancake.
- Flip the pancake over to expose the swirl side and serve with syrup or they are great by themselves as well.  Enjoy.

I link up to these awesome parties 

Friday, December 7, 2012

Double Dipped Eggnog Glazed Baked Donuts


It appears I've been on a little bit of an eggnog kick lately. 

Though I have a very good reason why, I honestly never drink it.
 I get so excited to see anything christmassy at the grocery store every year, that I don't care what it is, no matter if I like it or not I will buy it just for the nostalgia of the holidays.....i.e. Pumpkin spice creamer, canned pumpkin puree, gingerbread tea, eggnog and even fruit cake (okay I lied about the fruit cake, I will still not eat that) 

Even though I only like eggnog for the first 2 sips.  I don't want to see it go to waste, so why not incorporate eggnog in all my favorite recipes. 


Double Dipped Eggnog Glazed Donuts
Adapted from  Food.com
Yields: 18 Donuts

Ingredients

 1/2 cups + 2 tablespoons butter at room temp
1 1/4 cups sugar
2 eggs
3 cups flour
4 1/2 teaspoons baking powder
1/2 teaspoons salt
1/2 teaspoons nutmeg
1 teaspoon cinnamon
1 cup milk

Directions

- Preheat oven to 350 degrees 
- In a electric mixer, combine the soften butter and sugar together, mix for 2-3 minutes
- Add the eggs and mix until blended
- In a separate bowl combine the flour, salt, baking powder, salt, nutmeg, and cinnamon
- Add the dry ingredients to the wet mixture and mix until combined
- Add milk to the batter and mix, the dough should start getting thick and slightly sticky
- Using a donut pan, lightly grease the pan with pam or butter, spoon your batter into a pipping bag, snip a hole in the bottom and pipe the batter into each donut mold about half way full
- Bake for 14 minutes or until a toothpick inserted in the middle comes out clean


Eggnog Glaze

Ingredients

1/3 cup butter
4 tablespoons eggnog
2 cups powdered sugar

*Double the recipe to glaze all donuts

Directions

Melt the butter in the microwave, add the powdered sugar and eggnog and mix until all the sugar is dissolved  dip you half of you cooled donuts in the glaze.  Let stand for 10 minutes and dip again. or using a large spoon, drizzle the second coating over the donuts. 


I link up to these fun parties and entered my recipe into the Shine Supper Club Holiday treat contest. 

Related Posts Plugin for WordPress, Blogger...